Windows & Doors Support

Professional installation, warranty information, installation guides, and energy ratings lookup for your VDK products.

Professional Installation

Our team of certified installers ensures your windows and doors are installed to the highest standards. With years of experience and factory-trained expertise, we guarantee a perfect fit and optimal performance.

  • Factory-trained installation technicians
  • Warranty-backed workmanship
  • Clean, efficient installation process
  • Proper sealing and insulation guaranteed
Request Installation Quote

Expert Installation Services

Available for residential and commercial projects throughout our service area.

Contact us for a free installation quote

Our Warranty

VDK Windows & Doors stands behind the quality of our products. View warranty documents, coverage details, and how to file a claim on our dedicated warranty page.

Warranty Details & Documents

Installation Instructions

Select a product category below to view detailed installation instructions.

  1. 1 Place the window unit into the prepared opening, ensuring adequate space is provided for proper shimming and insulation.
  2. 2 Level the sill and shim the unit at the corners, mullions, midpoints, at every 16 inches. Ensure the window is level, plumb, and square before anchoring through the jambs at the shim points. DO NOT ANCHOR UNIT THROUGH JAMB EXTENSIONS.
  3. 3 Maintain a minimum 1/4" clearance between the window and the masonry sill, and a 3/8" clearance between the window and the masonry sill to prevent binding due to expansion, contraction, or settlement over time.
  4. 4 Loosely fill cavity between frame and opening with fibre insulation or non-expanding foam being careful not to overfill or overpack.
  5. 5 For siding applications, install a drip cap above the window. Verify the functionality of the window prior to applying interior trim or exterior finishes such as brick or siding.
  6. 6 Apply a high-quality, exterior-grade caulking to seal the gap between the window frame and the opening, ensuring all voids are fully sealed for optimal protection against the weathering elements. WINDOWS ARE NOT DESIGNED TO CARRY ANY BEARING LOAD.
  1. 1 Place the door unit into the prepared opening, ensuring adequate space is provided for proper shimming and insulation. Verify the rough opening dimensions match the door size.
  2. 2 Check that the opening is square, level, and plumb. Install weatherproofing membrane and flashing around the opening perimeter to prevent water infiltration.
  3. 3 Level the threshold and shim the frame at the corners, midpoints, and at every 16 inches along the side jambs. Ensure the door frame is level, plumb, and square before anchoring through the predrilled holes behind the weatherstrip at the shim points.
  4. 4 Maintain proper clearance between the door frame and the opening to prevent binding due to expansion, contraction, or settlement. Ensure threshold clearance is appropriate for proper door operation.
  5. 6 Loosely fill cavity between frame and opening with fibre insulation or non-expanding foam being careful not to overfill or overpack, especially around moving parts and hardware.
  6. 7 Install door hardware (locks, handles, deadbolts) according to manufacturer instructions. Verify the functionality of the door, including lock mechanism, prior to applying interior trim or exterior finishes.
  7. 8 Apply a high-quality, exterior-grade caulking to seal the gap between the door frame and the opening, ensuring all voids are fully sealed for optimal protection against the weathering elements. DOORS ARE NOT DESIGNED TO CARRY ANY BEARING LOAD.
  1. 1 Place the patio door unit into the prepared opening, ensuring adequate space is provided for proper shimming and insulation. Verify the rough opening dimensions match the patio door size.
  2. 2 For sliding patio doors, retain any shipping straps or supports during installation to ensure the unit remains securely positioned in the opening. Do not remove until the door is securely installed.
  3. 3 Ensure the opening is square, level, and plumb. Install proper flashing and weatherproofing system around the opening perimeter, paying special attention to the threshold area for water management.
  4. 4 Level the threshold and shim the frame at the corners, midpoints, and at every 16 inches along the side jambs. Ensure the door frame is level, plumb, and square before anchoring through the jambs at the shim points. DO NOT ANCHOR UNIT THROUGH JAMB EXTENSIONS.
  5. 5 Install the threshold ensuring proper slope for drainage away from the interior. Maintain proper clearance between the door frame and the opening to prevent binding due to expansion, contraction, or settlement.
  6. 6 Install door panels and adjust tracks or guides for smooth operation. Ensure panels slide or tilt smoothly without binding. For sliding doors, verify proper alignment with the track system.
  7. 7 Loosely fill cavity between frame and opening with fibre insulation or non-expanding foam being careful not to overfill or overpack, especially around tracks and moving components.
  8. 8 Install hardware (handles, locks, multi-point locking systems) according to manufacturer specifications. Verify the functionality of the door, including sliding/tilting mechanisms and lock operation, prior to applying interior trim or exterior finishes.
  9. 9 Apply a high-quality, exterior-grade caulking to seal the gap between the door frame and the opening, ensuring all voids are fully sealed for optimal protection against the weathering elements. PATIO DOORS ARE NOT DESIGNED TO CARRY ANY BEARING LOAD.

A. Installation on Site – Frame Unassembled

  1. 1 Verify Rough Opening (RSO)
    Measure the building's rough opening. Confirm dimensions match the required patio door RSO specifications.
  2. 2 Check Floor Condition
    Ensure the sill surface is level. A level base is critical for proper frame alignment and smooth panel operation.
  3. 3 Assemble the Door Frame
    Lay frame components (head, sill, and jambs) on a clean flat surface. Apply sealant at all frame corner joints before assembly. Fasten jambs to head and sill using manufacturer-provided screws or connectors. Confirm frame is square by measuring diagonally corner-to-corner.
  4. 4 Apply Sealant Under the Sill
    Run a continuous bead of sealant beneath the sill area in the rough opening to prevent water leakage.
  5. 5 Set Frame into Opening
    Carefully lift assembled frame into the rough opening. Shim as required under the sill and along jambs. Ensure the frame is: Level, Plumb, Square.
  6. 6 Temporarily Secure Frame
    Remove jamb cover caps. Install a few screws on each jamb side to hold the frame in place while panels are installed.

B. Installation on Site – Frame Already Assembled

  1. 1 Verify Rough Opening Dimensions
    Measure the building opening to confirm it matches patio door RSO specifications.
  2. 2 Ensure Floor is Level
    A level floor is necessary for squaring the frame.
  3. 3 Apply Sealant Beneath Sill
    Apply sealant under the sill to prevent water infiltration.
  4. 4 Secure Frame in Opening
    Remove jamb cover caps. Install a couple screws on each side. Confirm jambs are plumb and frame is square.

Note: If panels are pre-installed, shim and fasten the unit now. If panels are not installed, continue with the steps below.

C. Installing the Panels

Fixed Panel Installation

  1. 5 Apply Caulking for Fixed Panel Seal
    Apply caulking along: entire support block at the bottom of the frame; interior width of both top and bottom exterior corners; full inside height of the frame corner.
  2. 6 Insert Fixed Panel
    Insert bottom of panel first. Then tilt the top inward. Install near the middle for maximum frame flexibility.
  3. 7 Push Fixed Panel Into Caulked Corner
    Seat the panel firmly into the corner where sealant was applied.
  4. 8 Install Top and Bottom L-Brackets
    Secure fixed panel with provided brackets.
  5. 9 Install Supplied Reinforcement Bar (Fixed Panel)
    Install the supplied reinforcement bar so it is evenly positioned between the top and bottom edges of the sash. Ensure equal spacing from both edges before securing it in place.
  6. 10 Install Fixed Snap-On Covers
    Snap fixed panel caps into place.
  7. 11 Install Multipoint Screws (Fixed Panel)
    Install multipoint screws through the frame into the fixed panel from inside.
  8. 12 Repeat for Second Fixed Panel
    Repeat Steps 5–11 for the second fixed panel.
  9. 13 Install Groove Cover
    Apply caulking at the top inside of the frame and snap groove cover into place.
  10. 14 Install Rail Covers
    Snap rail covers onto the interior side of both fixed panels.
  11. 15 Add Rubber Bumpers
    Install the largest bumpers at the top and the smallest bumpers at the bottom on both sides of each panel.

Operating Panel Installation

  1. 16 Install Sliding (Operating) Panels
    Insert top of panel into head track first. Lower bottom onto sill track.
  2. 17 Check Panel Operation
    Slide panels fully open/closed to ensure smooth movement and proper placement.
  3. 18 Install Reinforcement Bar (Operating Sash)
    Install the additional supplied reinforcement bar into the edge of the operating sash before attaching the interlocking cap to the sash edge. Ensure the bar is fully seated prior to securing the cap.
  4. 19 Install Operating Snap-On Caps
    Install snap-on jamb caps on the interior sides of the frame.

Final Anchoring & Adjustment

  1. 20 Shim and Secure Entire Unit
    Add additional shims as required. Install remaining fastening screws through frame into structure. Confirm final frame alignment: Square, Level, Plumb.
Energy Star Logo

Look Up Your Energy Rating

How to Find Your Window's ENERGY STAR® Rating

Every VDK window has a serial number on the bottom right corner (shown in blue in the image below).

Serial number location on VDK window

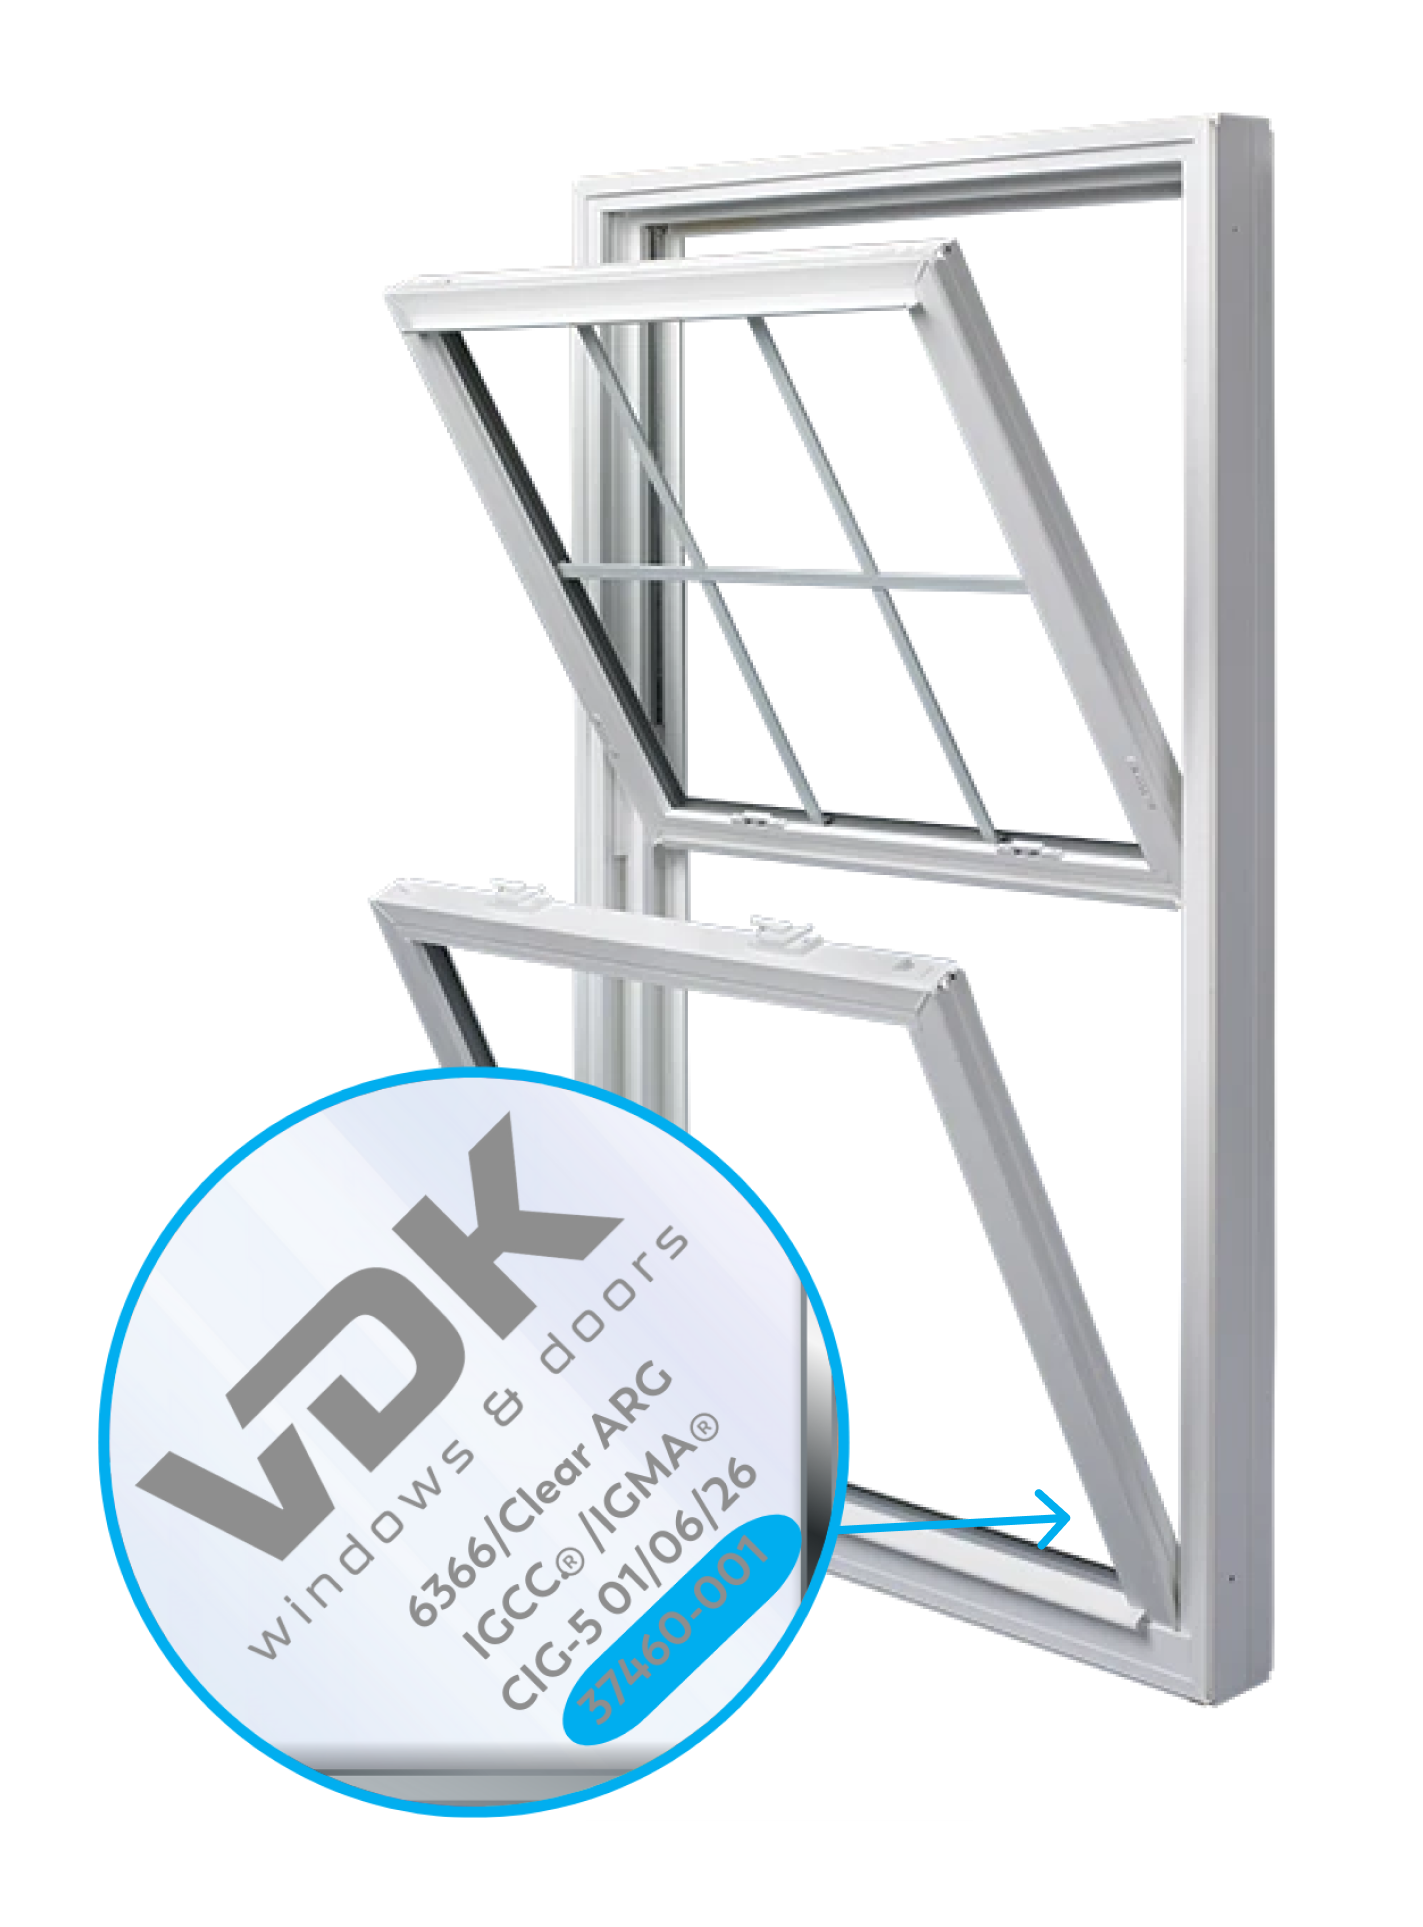
Enter that serial number below to view your window's ENERGY STAR® rating and full specifications.

Need Additional Help?

If you need assistance with installation or have questions about your product, our team is here to help.

Contact Us